How To Sew & Finish Your Own Cosmetic Bag Using This Free Pattern

Sew Your Cosmetic Bag
If you've been following this tutorial, you should already have all that's need at this point to make or sew your cosmetic bag. The pattern, which was shared in the first and second part of the tutorial should have already been cut, and marked with all the appropriate markings. The fabric itself should have been cut, and marked to match the ones on the patterns.
Also the fusible should have been applied appropriately to the fabrics. And all that's left to be done now is the sewing together of all the pieces. So, with no further ado, let us begin.
Sew aligned fabrics
")

Sew the Zipper


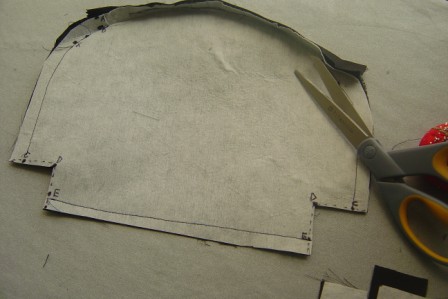
Preparing The Fabrics for The Cosmetic Bags
- Align main fabric pieces, wrong side together.
- Sew, from Point B to Point X (left side only), leaving about ½ an inch allowance from the edge of fabric. The other side (right side) will be sewn together after the zipper is secured.
- Using a pressing iron, iron the seam allowance along the zipper opening down onto the wrong side of fabric. The zipper will be secured to this.
You’re probably wondering why we are not sewing it all around. You see, getting the zipper in the right place can prove to be very difficult once you've sewn your pieces together. It limits how much space you have to maneuver the zipper around your sewing machine. So I like to have the zipper in place before actually sewing all the pieces together.
Sewing The Zipper Unto The Cosmetic Bag -
- To sew the zipper, first spread out the sewn piece to reveal bag opening
- Secure the zipper to the fabric with some pins
- Sew the zipper to the fabric, making sure you avoid the zipper teeth and tacks.
- With zipper now in place, sew the other side Point B to Point X , then Point X to C on both sides, leaving about ½ an inch allowance from the edge of fabric.
- Double-stitch on either ends of zipper Points A to B to reinforce seam.
- Leave zipper open with sewn fabric wrong side out.
Sew On The Zipper!

Sewing The Main Fabric


Sewing The Main Fabric of Cosmetic Bag -
Now that you have the zipper in place, it's time to secure both sides of the fabric pieces together. Making sure to match the dot markings of both pieces as shown. Use pins as much as possible to keep fabric from shifting during sewing.
- Sew pieces together from Point X to Point C on both sides, noting the ½ inch seam allowance.
- Sew bottom of bag together from Point E (left) to Point E (right) leaving the ½ seam inch allowance.
- Cut along dashed lines at Points C, D, and E as shown.
- Bring Point C and Point E together on both sides, aligning side and bottom seams as shown.
- Sew along from Point D to Point D allowing ½ inch seam allowance. This helps to create a flat bottom bag. Trim along seams and press.
- Turn bag right side out. Set aside. Now it's time to sew the lining pieces together.

Preparing, Finishing, and attaching the lining


- Free Cosmetic Bag Pattern To Make Your Very Own Cosm...
Making your own cosmetics bag can be a rewarding experience. Here is a free cosmetic bag pattern made with regular 8.5 X 11 Computer paper. - How To Make Your Own Cosmetic Bag | Fabric & Prepara...
Lining & Finishing The Cosmetic Bag
To prepare the lining fabric,
- Align lining fabric pieces wrong side together.
- Sew lining pieces from Point B to X, then Point X to C on both sides allowing about a ½" seam allowance.
- Secure the bottom of bag by sewing from Point E (left) to Point E (right).
- Cut along dashed line Points C, D and E .
- Bring Point C to E, aligning the side and bottom seams.
- Sew from Point D to Point D allowing about a ½" seam allowance.
- Iron lining to remove wrinkles.
- Iron the seam allowance of the zipper opening down onto the wrong side of lining.
- With wrong side out, place lining into the finished bag (bag should be right side out), aligning the side seams.
- Attached lining to finished bag by sewing it ⅛" below the zipper teeth.
- Trim all hanging threads.
- Iron finished bag.
***This tutorial is made under the assumption that you already know how to sew fabrics, linings and zippers. For beginners, following the video below may help. It contains a similar cosmetic bag tutorial***
Cosmetic Bag Sewing Tutorial
Personalize Options for Your Cosmetic Bag
Now that the bag is finished, it can be decorated as you wish. You can choose to personalize it using iron-on embroidery letters, flower petals, buttons, ribbons, or fabric paints. I hope you find this tutorial useful and that you enjoy making your next cosmetic bag.
♦♦♦♦♦♦♦♦♦♦♦♦♦♦♦♦♦♦♦♦♦♦♦♦♦♦♦♦♦♦♦♦♦♦♦♦♦♦♦♦♦♦♦♦♦♦♦♦♦♦♦♦♦♦♦♦♦♦♦♦♦♦♦♦♦♦♦♦♦♦♦♦♦
Do you love to write? Do you have a passion for sharing with others what you know? You can do that by signing up right here on hubpages. And guess what? You'll make some money doing it too. Writing, that is.
Author: Comfort Babatola - © 2013